POST Request
🔗 Original page — Source of this material
Description
ZennoPoster allows you to use ❗→ HTTP requests when working with various websites. You can send data using POST requests: submit registration data to a website, work with web service and application APIs, and perform many other actions on the web without using a browser, which can significantly reduce resource consumption and speed up execution.
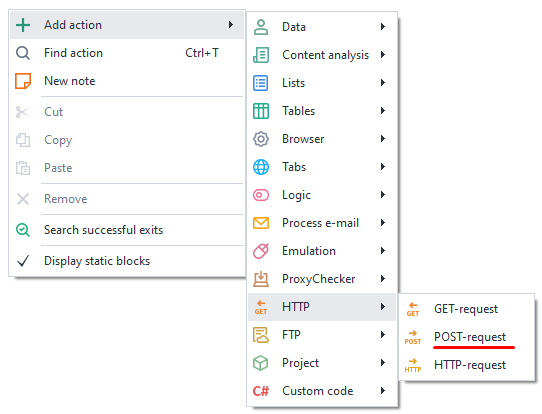
How to add an action to a project?
Through the context menu Add action → HTTP → POST request
Or use the ❗→ smart search.
What can this be used for?
- Template work without a browser
- Uploading files to a server
- Sending data to a website quickly
- Working with API services
- Registering on websites
Working with the action: “Basic” tab
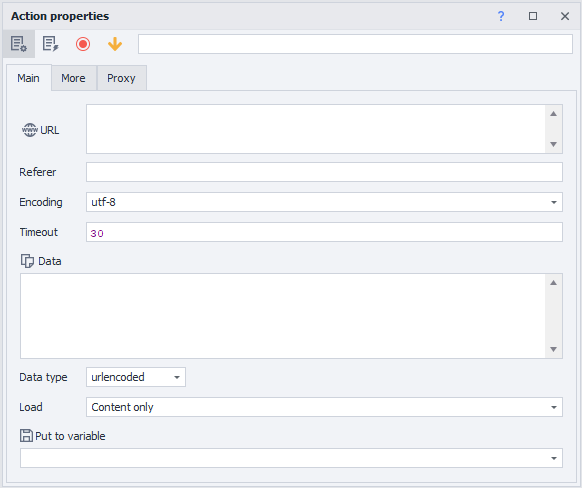
URL
The website address to which the request will be sent. You can use a ❗→ variable.
Referer
The request header *Referer contains the URL of the page from which you navigated to the current page. The *Referer header allows the server to know where the request came from. You can use ❗→ variable macros.
Encoding
The encoding in which the request will be sent.
Timeout
The maximum wait time (in seconds) for a response from the site. If this time is reached, the action will end with an error and follow the red branch. You can use ❗→ variable macros.
Data
The content of the request.
Data type
Here, you need to select what kind of data will be sent with this request. The selected value is sent as the Content-Type header.
urlencoded
Use this when you are sending text information to the server, indicated in the *Data field in the format parametername1=value1¶metername2=value2
Content-Type: application/x-www-form-urlencoded
multipart
Select this type when you are sending binary data (files) to the server using the request.
Content-Type: multipart/form-data
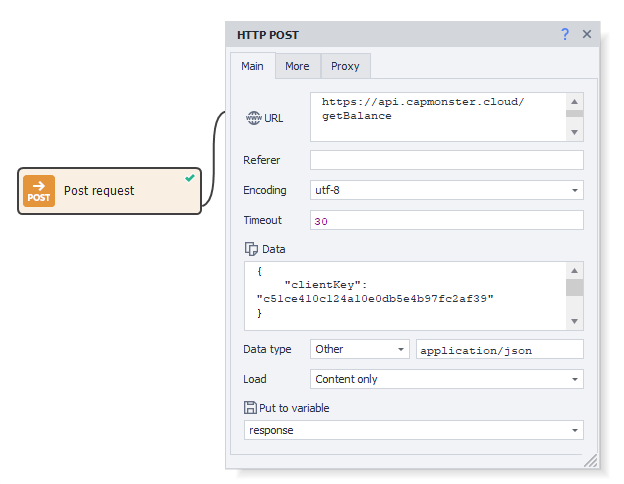
Other
You can specify a different data type if the options above are not suitable.
For example, for integration with the CapMonster Cloud API, you need to send POST request data as JSON. To do this, select *Other from the drop-down list and enter application/json in the field that appears.

Download
Only content
Only the body of the response will be saved to the variable.
Only headers
Only the response headers will be saved.
Headers and content
Both the response headers and its body will be saved to the variable. They will be separated by two empty lines.
As file
The variable will store the path to the file.
By default, files are downloaded to the Trash folder in the ZennoPoster installation directory. The path might look like this: C:\Program Files\ZennoLab\RU\ZennoPoster Pro V7\7.4.0.0\Progs\Trash\googlelogo\_color\_92x30dp.png. You can change this path in the settings, globally for all projects, or with an action during template execution.
As file + headers
The variable will store the response headers and the path to the downloaded file.
Save to variable
Here you need to select (or create a new) variable to store the result of the request.
Working with the action: “Advanced” tab
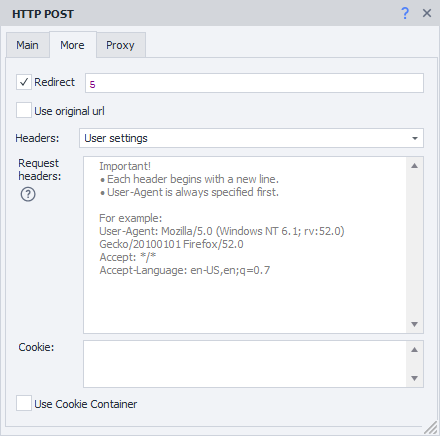
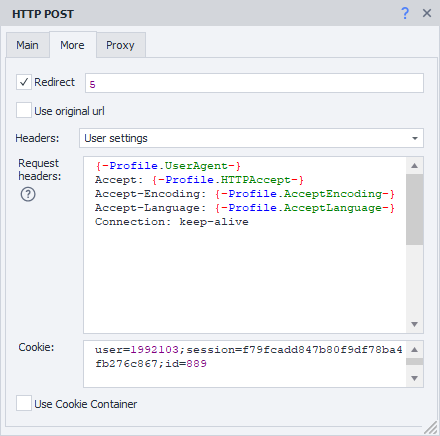
Redirect
Enable redirection: if the response contains a redirect code (e.g., 301, 302), ZennoPoster will use the Location header to proceed to the next page. Enter the maximum number of redirects allowed: 0 — stay on the original page, 5 — number of redirects to the final URL.
Use original URL
Disables URL encoding from the "Basic" tab to urlencode.
Example:
Original url: https://ru.wikipedia.org/wiki/Приветствие
By default: https://ru.wikipedia.org/wiki/%D0%9F%D1%80%D0%B8%D0%B2%D0%B5%D1%82%D1%81%D1%82%D0%B2%D0%B8%D0%B5
Headers
Use default
Default headers will be added to the request. Here’s what they look like (using a request to https://httpbin.org/get as an example, the Host header will change depending on the URL used in the request)
Host: httpbin.org
User-Agent: Mozilla/5.0 (Windows NT 10.0; WOW64; rv:45.0) Gecko/20100101 Firefox/45.0
Accept: text/html,application/xhtml+xml,application/xml;q=0.9,/;q=0.8
Accept-Encoding: gzip, deflate
Accept-Language: en-US,en;q=0.5
Current profile
Headers from the current ❗→ project profile will be used.
Load from profile
You need to select a file or specify a ❗→ variable containing the path to the ❗→ profile from which the headers for the request will be loaded.
Custom settings
Allows you to specify each request header parameter yourself.
Request headers
The first line must always (⚠) be the User-Agent string! Only then can you specify other headers.
- Each header starts on a new line.
- You can specify *static values, your own ❗→ *variables, or ❗→ *profile variables.
Cookie

You can provide cookies directly or use a ❗→ variable.
Format: name=value , multiple separated by ; (semicolon). Example:
user=1992103;session=f79fcadd847b80f9df78ba4fb276c867;id=889
Starting from version 7.1.6.0 (5.45.0.0), this input field is only visible when the "Use CookieContainer" option is turned OFF (explained below).
Use CookieContainer
CookieContainer allows cookies to be synchronized between the browser and individual requests, without needing to manually parse and insert them.
Example
A project works with a site using requests, but to work, you must be authorized/logged in. Suppose the authorization process is too complex to reproduce with requests, so you use browser mode to log in.
Then you ❗→ turn off the browser and start working with the site using requests. If you turn on the Use CookieContainer setting, cookies will be automatically synchronized between the browser and requests, so you do not need to do anything manually—cookies will be automatically used in requests. And if any request receives updated cookie values, those will also be synchronized. So, the next request (or opening the site in the built-in browser) will use the updated value.
Example of custom settings
Using profile variables for headers and manually setting cookies.
Working with the action: “Proxy” tab
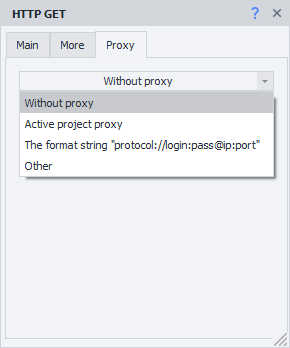
No proxy
The action will use the real IP address of your computer/server.
Current project proxy
Uses the ❗→ proxy set in the project.
Format string
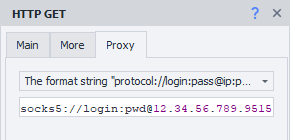
Specify the proxy in this format (you can specify a ❗→ variable):
a) With authorization - socks5://login:password@ip:port or http://login:password@ip:port
b) Without authorization - socks5://ip:port or http://ip:port
c) Without protocol specified (http:// will be used by default) — login:password@ip:port or ip:port
Other
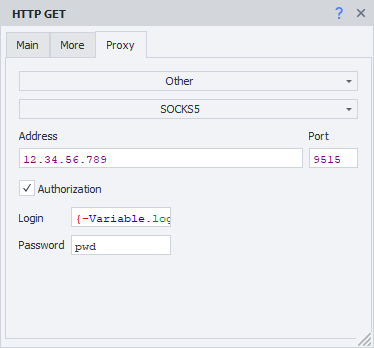
Choose this if you need to specify detailed proxy settings. Proxy type, authorization data, address, and port. Please check these details with your service provider.
You can use variables in all input fields.
If you do not specify a proxy protocol, http:// will be used by default.
Creating actions from requests in the Traffic Monitor
Added in ZennoPoster 7.1.5.0 (5.44.0.0)
You can create a ready HTTP request directly from the ❗→ Traffic Window.
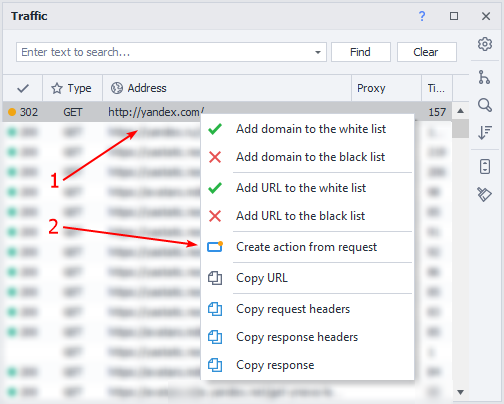
- Hover over the desired request and right-click to open the context menu.
- Click Create action from request.
A fully filled-out HTTP request action will appear on the project canvas.
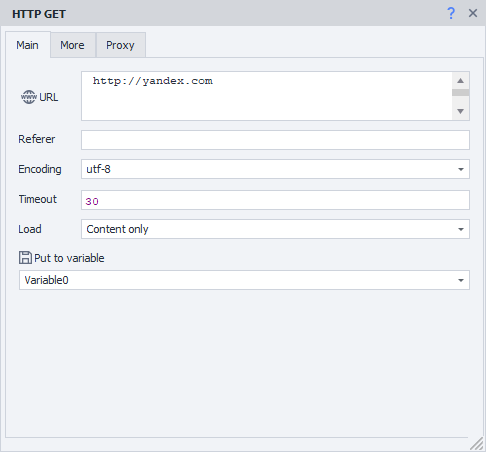
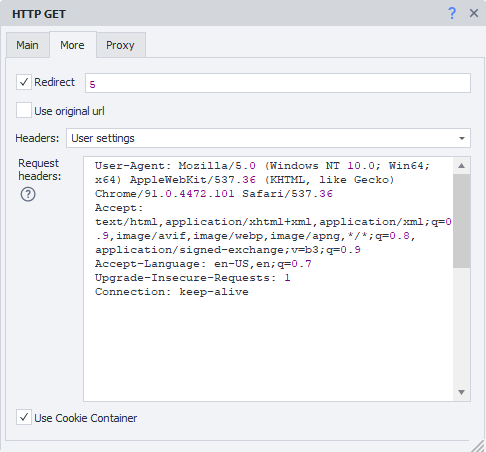
You can change static values or replace them with variables—the action is fully ready for use.
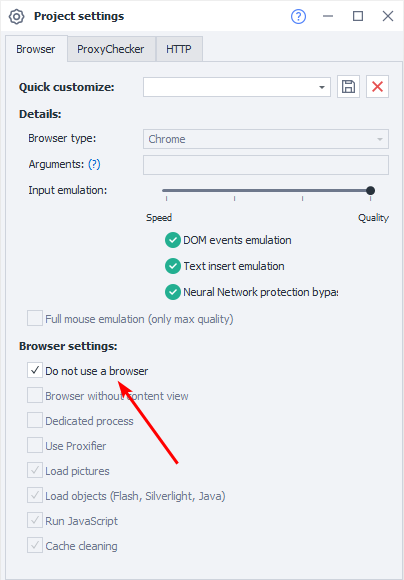
Disabling the browser
If you work only with requests, you can disable the browser to save your computer's resources; you can do this either in the ❗→ project settings or by using the ❗→ Browser Settings action.
Request transmission method
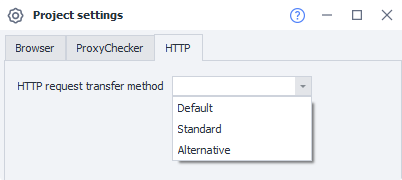
ZennoPoster has two ways of working with requests: external (the standard method, using the Chilkat library) and internal (the alternative method). If something doesn’t work correctly with HTTP requests using the standard method, try switching to the alternative method.
You can change the request transmission method in the ❗→ program settings (globally for all projects) or in the ❗→ specific project settings.
Example usage
You need to send a response from ❗→ ReCaptcha2 to a website to pass an anti-bot system.

- Get the captcha response
- Add a ❗→ POST request action
- Fill in all the fields
- Enter the captcha response in the required format in the data field
- Submit the response on the website
- Pass the site's protection
By using the browserless method, you save time and resources otherwise spent solving captchas in the tab window.